India Yogashala

Yoga Poses

Mandukasana (Frog Pose)
Blog, Yoga Poses

Mandukasana (Frog Pose): Steps, Benefits, and Practice Tips

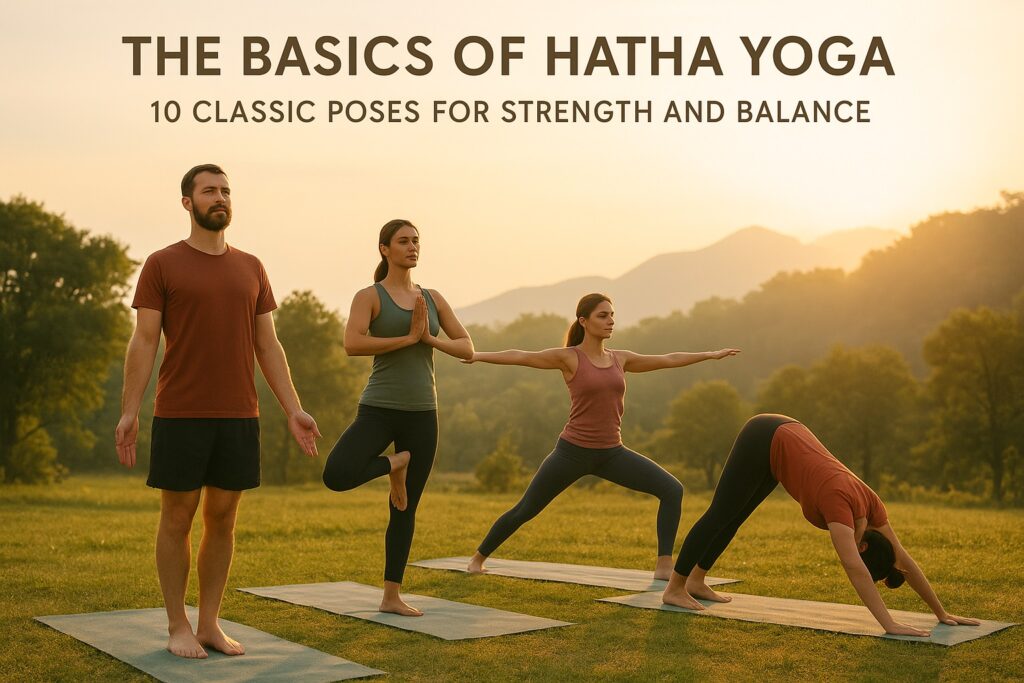
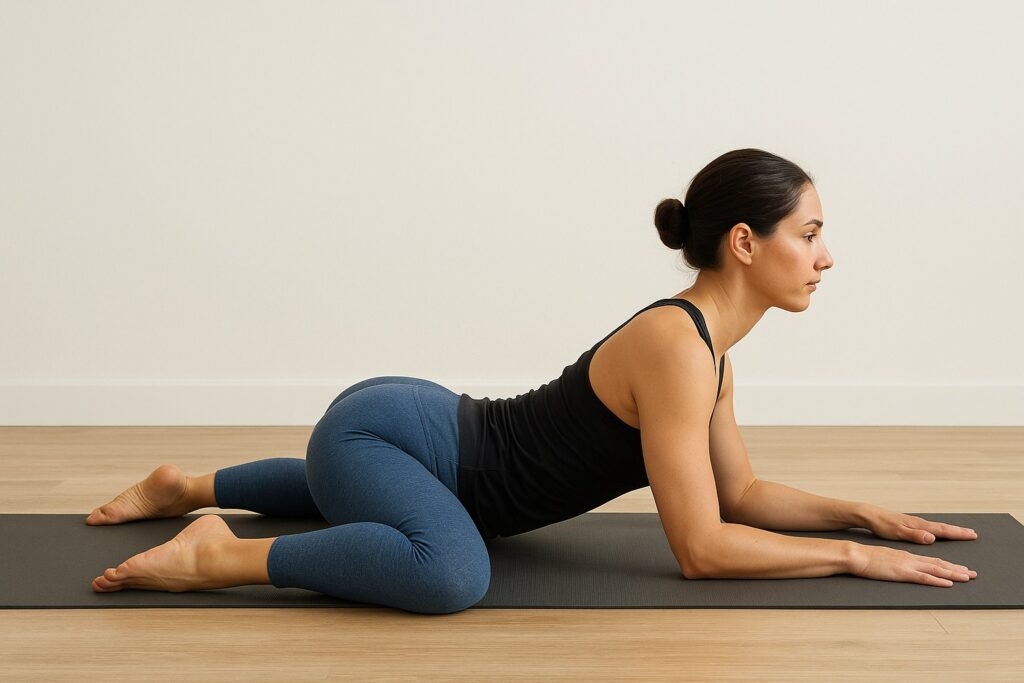
I’ve been practicing yoga for years now, and one pose that has truly transformed my hip flexibility is Mandukasana, commonly known as Frog Pose. The name comes from the Sanskrit word “Manduka,” which means frog—and when you’re in this pose, you’ll understand exactly why. Your body mimics the wide-legged, grounded posture of a frog resting on the ground. What I love about Mandukasana is how accessible yet challenging it is. It’s become incredibly popular in modern yoga practices because of its powerful hip-opening qualities. Whether you’re working on flexibility, pelvic mobility, or just trying to undo hours of sitting at a desk, this pose delivers. The best part? Almost anyone can practice it. I’ve seen complete beginners ease into modified versions, while advanced practitioners push deeper into the stretch. It’s truly a pose that meets you where you are. How to Do Mandukasana: Step-by-Step Guide Preparatory Steps Before I dive into Frog Pose, I always make sure my body is properly warmed up. Trust me, attempting this on cold muscles is not a pleasant experience. I typically start with some gentle hip rotations, moving my hips in circles to wake up the joints. Then I’ll spend a few minutes in Butterfly Pose, letting my knees drop to the sides while I breathe into my hips. Cat-Cow stretches are also essential—they warm up my spine and pelvis, preparing my body for the deeper opening ahead. The golden rule I follow: never rush into Mandukasana without warming up. Your hips and knees will thank you for the preparation. Step-by-Step Instructions Step 1: I begin on my yoga mat in tabletop position—hands directly under my shoulders, knees under my hips. This is my stable starting point. Step 2: Slowly, I begin to widen my knees. I move them apart as far as feels comfortable, not forcing anything. Some days I can go wider than others, and I’ve learned to honor that variation. Step 3: I make sure my ankles are aligned with my knees, and I flex my feet so my toes point outward. This alignment is crucial for protecting my knee joints. Step 4: Depending on my flexibility that day, I’ll either lower down onto my forearms or, if I’m feeling more open, bring my chest closer to the mat. I never force myself to go lower than my body allows. Step 5: Here’s where the magic happens—I engage my core slightly to support my lower back, then consciously relax my hips, allowing gravity to do the work. I’m actively passive, if that makes sense. Step 6: I hold the final position, wherever that is for me, and focus on my breath. Deep, steady inhales and exhales help me soften into the stretch rather than fight against it. Step 7: To release, I very slowly walk my hands forward, shift my weight, and gently bring my knees back together. I never rush this exit—it’s just as important as entering the pose. Also Read: The Basics of Hatha Yoga: 10 Classic Poses for Strength and Balance Common Mistakes to Avoid I’ve made plenty of mistakes with this pose, especially when I was eager to go deeper faster. One major error I see often is dropping into the lower back. When I let my spine sag, I lose all the benefits and risk hurting myself. Overstretching the knees is another trap I’ve fallen into. If my knees start to hurt—not just stretch, but actually hurt—I know I’ve gone too far. I’ve learned to respect that signal. Collapsing my chest or shoulders used to be my default, but I realized it compromises the pose’s integrity. Now I focus on maintaining length through my spine, even when I’m folded forward. And here’s something I do unconsciously when uncomfortable: holding my breath. I have to consciously remind myself to keep breathing. The breath is what allows the opening to happen. Modifications & Variations When I’m teaching beginners or when my own hips are particularly tight, I always suggest using props. Placing cushions or folded blankets under the knees makes a world of difference. It reduces pressure and allows you to stay in the pose longer without discomfort. Half Frog Pose is my go-to recommendation for newcomers. Instead of widening both knees, you keep one leg extended behind you. This allows you to experience the hip opening on one side without overwhelming your body. For those days when I want to go deeper, I use blocks under my chest. This advanced variation allows me to sink my hips lower while maintaining proper upper body alignment. During my pregnancy, I practiced a wide-knee supported version with lots of bolsters. It gave me the hip opening I craved without putting pressure on my belly. Always listen to your body and consult with a prenatal yoga instructor if you’re expecting. Also Read: Top 10 Best Sitting Yoga Asanas Images With Names: A Complete Guide Benefits of Mandukasana Physical Benefits I cannot overstate how much Mandukasana has improved my hip joint mobility. After years of sitting at a desk, my hips were locked up tight. This pose has been instrumental in restoring movement and freedom to that area. The stretch I feel in my inner thighs, groin, and pelvic muscles is intense but incredibly satisfying. These are areas we rarely stretch in daily life, and Mandukasana targets them all at once. My overall lower body flexibility has improved dramatically since incorporating this pose into my practice. I notice the difference when I walk, run, and even just move through my day. What surprised me most was how it strengthened my glutes and core. While it’s primarily a stretch, maintaining proper form requires significant muscular engagement. My posture and spinal alignment have improved as a result. Therapeutic Benefits On days when my lower back is tense from stress or poor posture, Mandukasana provides genuine relief. The hip opening indirectly releases tension that radiates into the lower back. I’ve spoken with many women who swear by this pose for menstrual discomfort. While I

yoga poses for two people
Blog, Yoga Poses

Yoga Poses for Two People: A Guide to Couple Yoga

Yoga is a mindful journey of inwards, a deep conversation between your mind, body, and breath. When another person joins you in this journey of wellness, you will feel something magical happening to you. Practicing yoga can be a shared language which later turns into a practice of laughter, presence, support, and trust. Partner yoga is a collaborative experience where you learn to balance yourself with someone, find stillness and breathe with them together. It is a fun way to elevate your yoga practices and enhance its overall results. Whether you are practicing with your friend, partner, or a family member, this two-person yoga is a nice way to connect with each other, physically, mentally, and emotionally. This blog is all about how partner yoga works and what makes it so powerful. Here, understand the step-by-step details about the 12 best partner yoga poses and how to perfectly practice them.  What is Partner Yoga (Couple Yoga)? Couple yoga, also known as partner yoga, is the practice of performing yoga poses with two person, using each other’s bodies for support, balance, and deeper stretches. Unlike traditional solo yoga, partner poses require coordination, communication, and trust between both participants. It’s important to distinguish couple yoga from acro yoga. While both involve two or more people, acro yoga incorporates acrobatic elements with one person typically lifting or balancing the other in more advanced, gravity-defying positions. Couple yoga, on the other hand, focuses on accessible poses that emphasize connection and mutual support rather than impressive aerial feats. The philosophy behind partner yoga centers on shared energy and the concept that two people practicing together can achieve more than they might individually. This practice creates a feedback loop of support—when one partner struggles with balance, the other provides stability; when one needs encouragement, the other offers presence. This mutual reliance fosters emotional bonding and teamwork that extends far beyond the yoga mat. Benefits of Partner Yoga Poses Partner yoga is a shared experience where two people practice together to build their strength and improve their poses alignment. This yoga type combines the traditional asanas with some mindfulness, acrobatics, and breathing in synchronization. Let’s understand the different benefits of partner yoga before diving into the 12 specific poses-  1. Enhances Communication Communication is one of the major benefits of practicing partner yoga as it emphasises you to tune in with your partner both emotionally as well as physically. Every movement practiced will require a rhythm that is shared. You then start to give feedback to each other in the non verbal form and start sensing the other person’s energy. With the help of this, you can build better communication and understanding with each other.  2. Deepens Connection When you practice together, you start breathing, stretching, and balancing together with each other. You need to build trust and cooperate with each other while performing different asanas. Being communicative and building connections helps in staying fully present to align movements. This way you can create an effective impact on your relationship with your partner. Especially, if you are practicing it with your significant other, then it will help you increase emotional intimacy as well as empathy.  3. Improves Balance and Alignment When you start practicing asanas correctly, partner yoga helps you to align your body more clearly. Your partner will be a mirror and stabilizer while practicing with you, which will ultimately refine your postures in a way that is hard to achieve when you are practicing alone.  4. Increases Flexibility and Strength Partner yoga increases your strength as well as flexibility in a more enhanced way. Your body is prepared by practicing some stretches together. You can improve your body’s balance while practicing the dynamic asanas with your partner in order to increase flexibility and overall strength of your body.  5. Encourages Mindfulness and brings Joy When two people are practicing yoga together, it requires attention from both the people. This shift in position is a part of meditation. Then there are some poses which will make you fall or laugh together, this is the fun part. These moments during partner yoga reduces your stress and brings utmost lightheartedness into your practice The Basics of Hatha Yoga: 10 Classic Poses for Strength and Balance 12 Best Yoga Poses for Two People Let us now begin talking about the 12 yoga poses which are majorly beneficial and can build your trust, strength, as well as emotional compatibility. Whether you are a beginner or an advanced practitioner, these poses can be adjusted and practiced according to your comfort level.  1. Seated Centering (Easy Pose with Partner) Source This pose sets the foundation for your partner yoga session. It encourages mindfulness, synchronization, and a sense of shared presence. Sitting face-to-face allows you to connect through breath and energy, creating harmony between both partners. It’s a gentle reminder that yoga is not just about physical alignment, but also emotional and energetic attunement with each other. How to Do It: Sit cross-legged back-to-back with your partner, ensuring your spines are touching from tailbone to upper back. Rest your hands on your knees or in your lap. Close your eyes and begin to notice your partner’s breath against your back. Gradually work to match your breathing patterns, inhaling and exhaling together. Sit in this connected state for two to three minutes, setting an intention for your practice together. Focus & Tips: Feel the rise and fall of your partner’s ribcage with each breath. Allow your spines to support each other equally—neither person should lean heavily backward. This pose is about mutual support and presence. Benefits: Establishes a calm, connected foundation for your practice. Synchronizes breathing patterns and heart rates. Promotes mindfulness and present-moment awareness. Helps both partners transition from the external world into a shared practice space. 2. Partner Forward Fold Source A deeply grounding pose, Partner Forward Fold promotes mutual flexibility and trust. It’s an excellent way to open up your hamstrings and lower back while relying on your partner for

hatha yoga poses
Blog, Yoga Poses

The Basics of Hatha Yoga: 10 Classic Poses for Strength and Balance

Hatha yoga is where the journey of most of the yoga enthusiasts begins. It is the fundamental branch of yoga which majorly focuses on asanas, breathing synchronization, and better alignment. It is one of the oldest yoga forms to exist, dating back to 2000 years ago. Hatha yoga works with both, mindful yielding which means balance and muscle engagement which means focusing on strength. If you wish to have strength that is not flashy but steady and long lasting, then this is the perfect yoga form to practice.  In this blog, you will be learning about how Hatha yoga is so effective and why people prefer to practice it more. Practice these poses and teachings consistently to notice the changes in your daily movements. All the detailed information of the basics of Hatha Yoga are mentioned here, which will help you to form the best foundations of your practice.  What is Hatha Yoga? Hatha name is taken from two Sanskrit words, “Ha” meaning the sun and “Tha” meaning the moon. The meaning of this yoga form is not literal to the words but represents it symbolically, the sun represents active and energizing principle whereas the moon symbolises receptive and calming principle. The traditional Hatha yoga is practiced by equally balancing these two forces in order to make your body feel strong and steady.  Hatha yoga is a slow paced style that focuses on holding a particular pose for longer durations. It helps in improving alignment, awareness, and muscle engagement. This is the reason why Hatha is preferred as a foundational yoga style to teach. It not only moves your body but also trains your mind. The stillness you foster within you on the mat also assists your decision in your daily life, which makes you more aware about how you handle real life situations.  10 Classic Hatha Yoga Asanas for Strength and Balance Mountain Pose (Tadasana) Mountain Pose looks simple, but it is the foundation of all standing yoga postures. By practicing it, you learn how to align your body, distribute your weight evenly, and stand with awareness. This pose improves posture, strengthens the legs, and develops a sense of grounding. It also sets the tone for mindfulness, making it easier to transition into more complex asanas. Why it matters: Mountain pose is a powerful yoga asana that is a neutral template for all the standing poses. It reflects that when you know how to stand well, everything else like walking or twisting will become efficient. For proper balance, it is important to learn the fundamentals.  Step-by-step guide to perform Anatomy and practice tipTadasana refines foot proprioception and involves the tibialis anterior, spinal extensors, and intrinsic foot muscles. You must practice this daily as a baseline asanas and for resetting your posture.  How to Start Teaching Yoga: Tips for New Instructors Tree Pose (Vrikshasana) Tree Pose is one of the best balancing postures to build stability in the body and focus in the mind. By standing on one leg, you challenge your coordination and engage the small stabilizing muscles in your ankles, legs, and core. The pose also encourages concentration, patience, and calmness. Over time, Tree Pose helps you feel more centered and confident in both your practice and daily life. Why it matters: Vrikshasana is an important Hatha yoga pose which is a direct test about the way your nervous system and muscles are coordinating the moment your base becomes small. It teaches single-leg stability and undivided concentration.  Step-by-step Anatomy and practice tipVrikshasana is going to challenge your intrinsic muscles of the feet, stabilize the ankle muscles, and train your core for balance. This asana is excellent for someone who wants to practice controlled micro adjustments.  Warrior II (Virabhadrasana II) Warrior II is a strong and energizing asana that develops both stamina and stability. Holding this wide-legged posture strengthens the thighs, hips, and shoulders, while opening the chest for better breathing. It encourages resilience, teaching you how to stay steady even when the body begins to tire. Practicing Warrior II regularly also improves focus and builds the mental strength to “hold your ground. Why it matters: Virabhadrasana II is a powerful yoga pose that helps in building hip, leg, and shoulder endurance along with teaching you to hold balance with a long spine and open chest. It is ideal for someone who wants functional strength and how to distribute efforts across the wide base.  Step-by-step Anatomy and practice tipWarrior II or Virabhadrasana II is an ideal yoga pose for strengthening your hamstrings, glutes, quadriceps, and hip adductors. Practicing this consistently will build symmetrical resilience in you, along with helping you with improving your daily imbalances.  How Much Time Does It Take to Become a Certified Yoga Teacher? Warrior III (Virabhadrasana III) Warrior III is a dynamic balancing pose that demands strength, stability, and concentration all at once. By standing on one leg and extending the body forward, you activate the core, glutes, hamstrings, and back muscles. This pose enhances body awareness and coordination while improving posture. Though challenging at first, it helps build both physical endurance and mental focus. Why it matters: Virbhadrasana III is also one of the most important asanas for training single-leg strength and teaching full body balance. It can be demanding but is scalable asana.  Step-by-step Anatomy and practice tipThis is an ideal yoga pose that engages with glutes, rector spinae, core stabilizer, and hamstrings. Practice Warrior III poses consistently for short holds and multiple repetitions in order to build good endurance.   Triangle Pose (Trikonasana) Triangle Pose is a powerful stretch that lengthens the legs, spine, and side body. It teaches you how to rotate the torso while keeping the spine long and aligned, which improves both flexibility and posture. The pose strengthens the legs, tones the waist, and relieves stiffness in the hips and hamstrings. It’s also grounding, helping you feel stable and spacious at the same time. Why it matters: Trikonasana is helpful in stretching your lateral body and learning to rotate

Scroll to Top